
 800万画素高清高解析,Wi-Fi、HDMI与USB三种连线方式应用更广泛!
肺炎疫情也持续一年多了,虽然台湾的疫情控制相当棒,不过对外的许多活动、聚会与商务会议都改线上举行,商务视讯会议中除了声音之外最重要的就是画面,若采用笔电内建的摄影镜头或是透过外接USB镜头,角度调整与功能只能说是堪用而已,在视讯会议过程中可共享电脑画面外,还可以透过实物摄影机撷取纸本资料在会议上分享与讨论。无论是远距会议沟通或者是校园教学都非常适合使用实物摄影机达到更好的会议与教学成效!
『VZ-X』无线实物摄影机拥有Wi-Fi、HDMI与USB三种连线方式,Wi-Fi可以用电脑或手机连线,连Apple TV也可连接使用,提升更多的便利性。USB则是直接连接电脑,而HDMI是直接连接电视、投影机或萤幕即可输出画面,三种连接方式让使用者可针对不同应用环境搭配最适合且简单方便的连线方式;VZ-X无线实物摄影机采用800万画素Sony CMOS感光元件,在USB模式可提供3264 x 2448高清解析度,HDMI与Wi-Fi无线模式则提供1920 x 1080解析度,录影则提供FHD 30fps解析度。本体有三处关节,可调整高度、角度与摄影机方向,快速灵活找到使用者需要的最佳角度,支撑臂可达到更宽广的摄影范围,最大可达28 x 50公分(16:9)与36 x 48公分(4:3)面积,底座有防滑橡胶设计,确保使用过程中的稳定度,VZ-X无线实物摄影机还内建电池,可提供9~12小时的续航力。
采用USB与Wi-Fi连线时可搭配IPEVO的Visualizer软体,达到更多功能的多元运用,例如快拍、分享萤幕画面、定格动画摄影、萤幕直播和录影功能,以及画面翻转、曝光调整、白平衡、滤镜..等,也可和许多远距会议将使用到的沟通软体相容。尤其是Wi-Fi无线连接模式,让使用者无论在何处都能不受线材限制,运用自由度极高,为使用者升级了更好的使用体验,也为繁复的会议中减少了器材使用的不便性与烦恼。接着就来介绍由IPEVO推出的『VZ-X』无线实物摄影机吧!
IPEVO VZ-X无线实物摄影机本体与包装▼包装三侧标示产品型号为VZ-X与产品可胜任各种应用环境的工作角度


▼后方标示保固与安规认证

▼包装上方有提把方便移动与携带

▼USB Type-C传输线,线长为150公分,基本上这样的线长非常足够,各种应用环境都没问题

▼VZ-X本体一览,上方有IPEVO字样,中间为I/O

▼产品型号为VZ-X无线实物摄影机

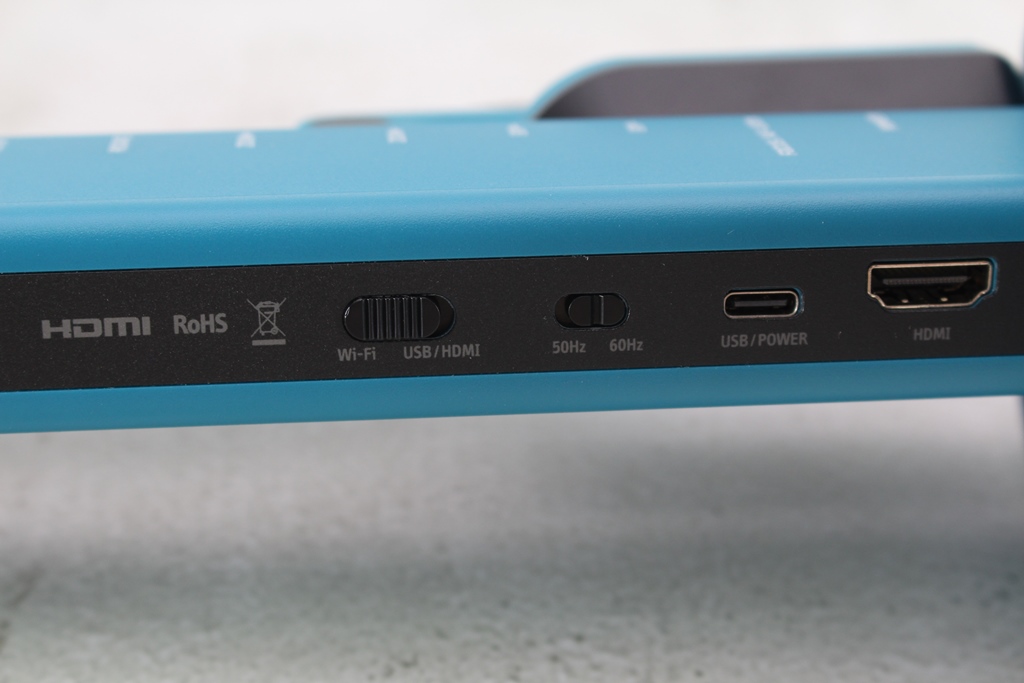
▼I/O分别为Wi-Fi与USB/HDMI连线方式切换、灯光市电频率切换、USB/Power连接埠与HDMI输出
▼产品为台湾制造,需求电压为5V,电流为2A

▼侧边标示功能键,平常没使用时可以将镜头收折起来不占空间


▼最上方为指示灯号,功能按键分别为补光灯、滤镜、旋转、放大、缩小、曝光+、曝光-、对焦与电源开关

▼底座看起来相当稳固

▼有快速照相按钮与电池电力指示灯号,拥有9~12小时续航力

▼底座有一整圈的防滑胶垫,使用起来更为稳固,还标示了Wi-Fi的SSID

▼共有三处关节,可依照使用环境调整使用

▼前方关节为调整高度使用

▼后方关节为调整镜头仰角

▼最后一处关节为调整镜头左右角度


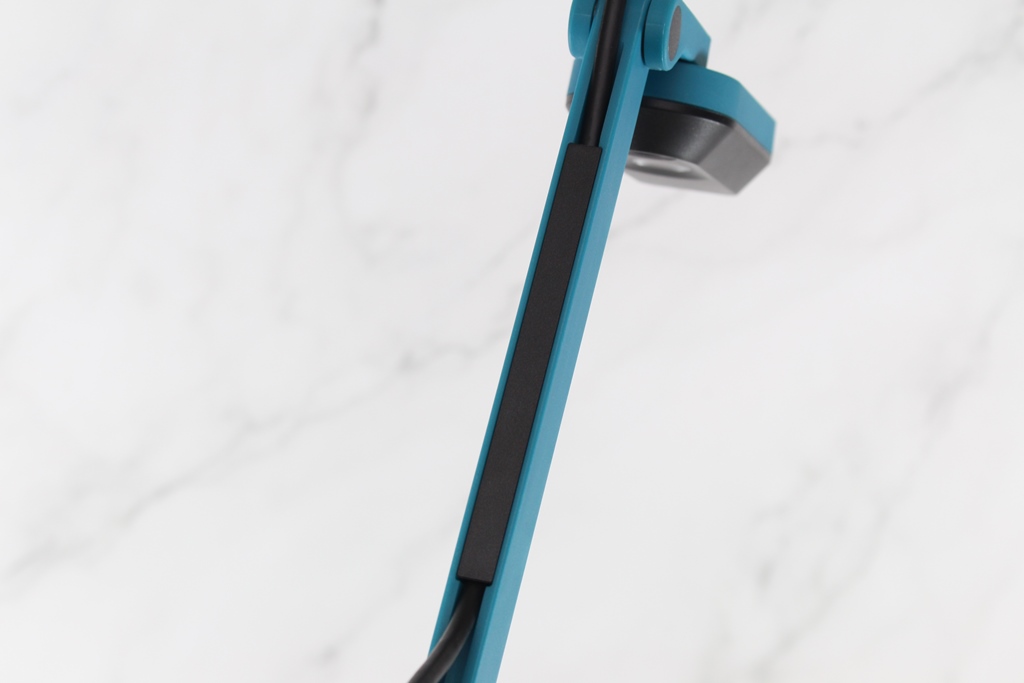
▼线材藏在支臂内
▼800万画素Sony CMOS感光元件,还有一颗补光灯
 IPEVO Visualizer软体介绍
▼软体介绍一般选项内可设定对焦/拍照声音、档案储存路径、档案名称格式与语言

▼拍照可设定倒数几秒后拍照

▼录影可设定麦克风装置与品质


▼慢动作录影可设定倍率与品质


▼直播可设定麦克风装置与RTMP伺服器或Youtube帐户

▼缩时录影可设定时间间隔与品质


▼软体相关资讯

▼软体可以开启现在影像讯息

▼影像设定与滤镜,可以透过细部调整让影像达到使用者的需求,像是缩放、解析度、曝光值、白平衡、对焦…等

▼四种影像模式,有展示、创建、阅读与扫描

▼展示有拍照、录影与直播三种

▼创建有录影、慢动作录影、缩时录影与定格动画四种

▼阅读有文字转语音、局部放大与遮罩三种

▼扫描可扫QR Code与文件

▼右下角有重新对焦的按钮,对焦完毕后画面会有绿色框

▼右下角有子母画面可以设定

▼可以在画面上写字或是画图案,可选择颜色跟粗细,右边还有橡皮擦可以使用,可以随时在图片上写字或是做标记,相当方便

 Wi-Fi连线与手机IPEVO Visualizer软体介绍
▼开启VZ-X的Wi-Fi功能后,手机可以看到VZ-X的SSID

▼直接连线后也不用做任何设定就能使用

▼开启手机版的IPEVO Visualizer,功能上与电脑端的大同小异,功能一样非常强,记得要先把相机切换成VZ-X

▼旋转与镜像设定,可调整角度与上下、左右翻转

▼解析度调整,Wi-Fi模式最大提供1920 x 1080

▼亮度调整

▼白平衡调整,可调整光源的发光k数

▼对焦设定,可设定微焦或是远处对焦

▼滤镜设定,内建超多款滤镜可以使用

▼照片拍摄后也可像手机相簿一样浏览

▼右下角有格线功能,让使用者可以更方便作构图

▼右下角有快速对焦功能,对焦完毕后会变成绿色框
 HDMI输出展示
 使用IPEVO VZ-X的HDMI输出,连接至影像撷取盒录影展示本体上的功能按键
▼滤镜功能展示
 按这里检视影片,登入论坛可以直接观看 按这里检视影片,登入论坛可以直接观看
▼其他功能展示
按这里检视影片,登入论坛可以直接观看 按这里检视影片,登入论坛可以直接观看▼应用示意图


▼转正面就可以直接变成网路摄影机使用

▼使用Wi-Fi无线连线方式与平板连接,就能轻松把画面呈现在平板上,无线就是这么方便!
 结语
结语IPEVO VZ-X无线实物摄影机真的是太方便了!拥有三种连线方式,搭配电脑可用USB与Wi-Fi,行动装置可搭配Wi-Fi使用,显示装置则直接搭配HDMI,三种连线方式可达到相当广泛的应用,各种环境都能胜任,规格方面算是中高规格,最高可提供3264 x 2448高清解析度,录影时提供FHD 30fps解析度,透过独家Visualizer软体可以做到相当多应用,像是滤镜、亮度调整、补光、画面旋转…等,功能相当齐全,每种模式还有细部选择,最厉害的是可以直接做直播,每个人都能轻松成为直播主,如果使用行动装置时也有专用App可以搭配,功能与电脑版一样齐全!实物摄影机不仅能当作网路摄影机,也能在会议中传递图片讯息,更能即时加上备注说明,不论是在教育环境还是商业应用都非常便利!爱比科技为美国科技教育领导品牌,在此专业领域耕耘已10多年,产品不断推陈出新,让功能与应用更为广泛,想找一台拥有高清高解析度与三种连线方式的实物摄影机吗?IPEVO VZ-X无线实物摄影机是个非常不错的首选。
喜欢我们的文章可以追踪我们,可以看到更多开箱文与业界消息
 https://www.facebook.co...ardware/https://3cjohnhardwar...ess.com/


